Side Dishes

Japanese Knotweed: A Healthy Edible Invasive

Japanese knotweed has a short 3-week growing season, but it can be frozen raw and used all year. If you like the taste of rhubarb, you'll enjoy knotweed. For more information about the best way to harvest knotweed, check out my e-book Joyful Foraging: Learn How to Feast on the Food Growing All Around You. Field garlic and garlic mustard, additional recipe ingredients, are also covered in this e-book.

One of the challenges of our virtual world, is that I never know who is really trying to find me. Before I launched TheJoyfulForager.com, I was WriterByNature.com. A huge shout out to Carly Leusner for crediting me for this knotweed recipe, even when I was in a state of metamorphosis.

Carly, if you're still around, Joe is a fellow member of the Connecticut Westchester Mycological Association. I'm reintroducing the chicken mushroom ingredient, which was part of Joe's original recipe:

JOE’S KNOTWEED/CHICKEN MUSHROOM SALAD

Ingredients:
4 Cups Cleaned/peeled Japanese knotweed
2 TBS Honey or agave
3 TBS Tamari or soy sauce
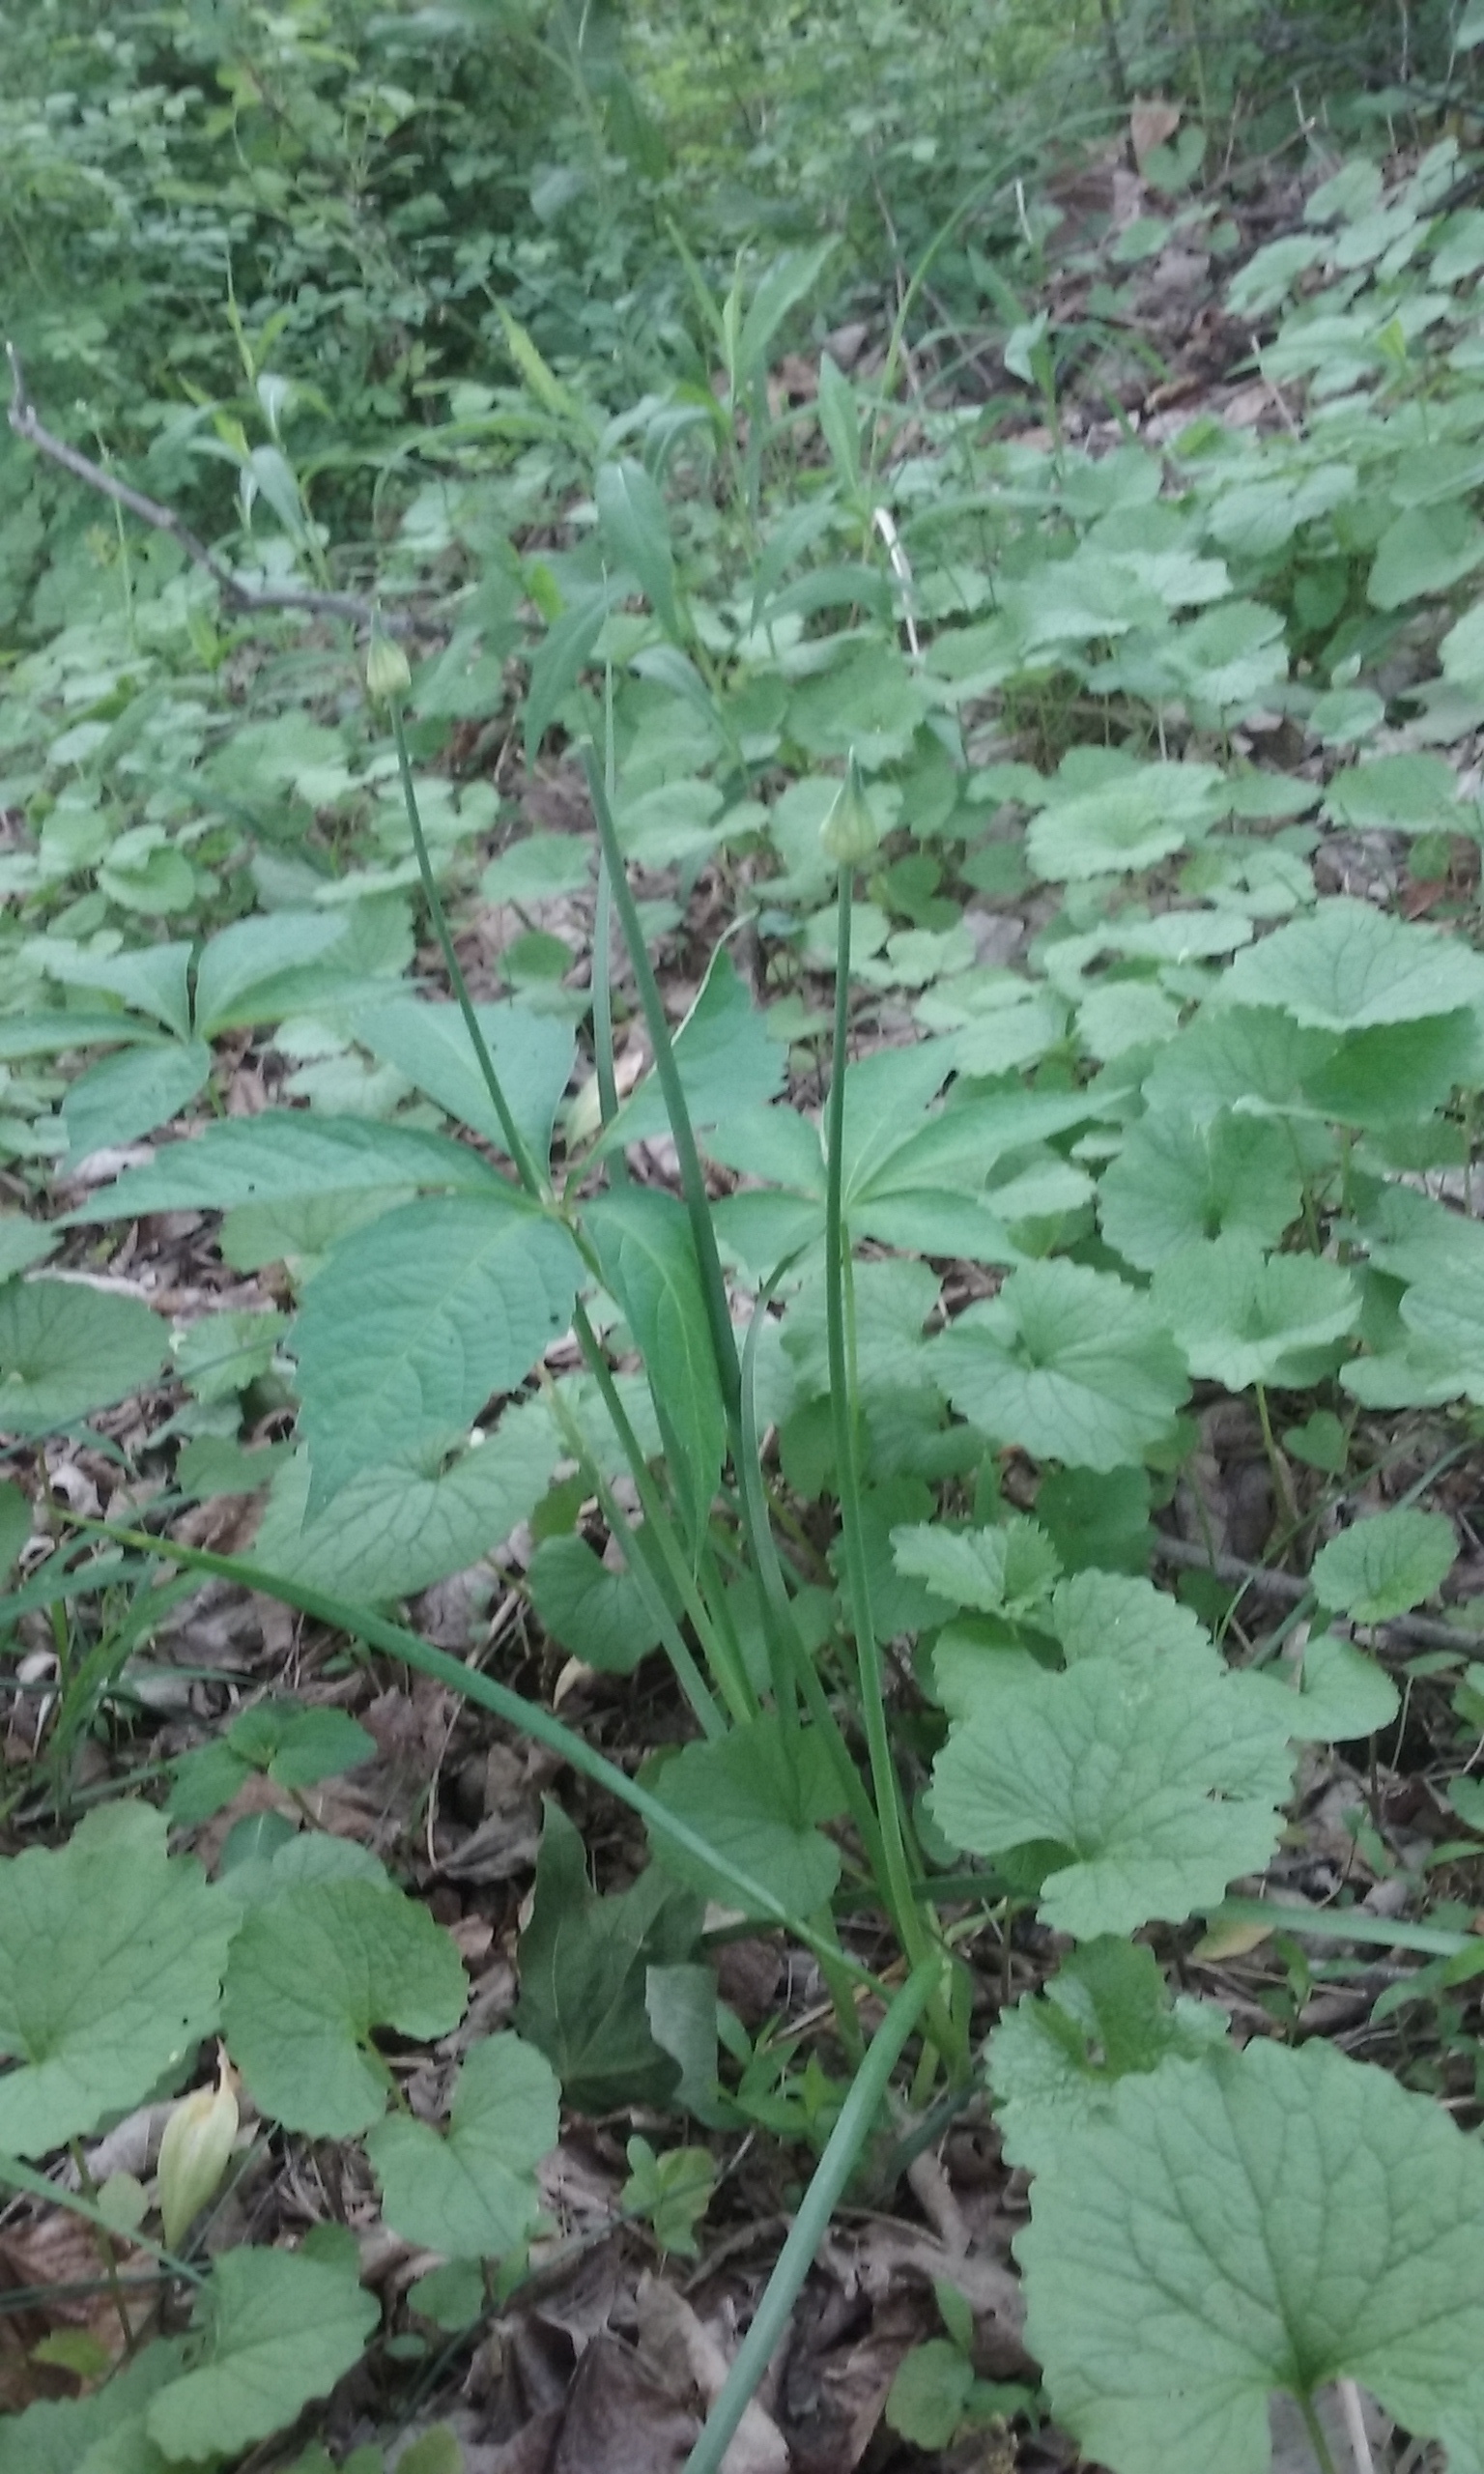
6-12 Field garlic leaves and bulbs (pull up a large clump)
1/2 tsp Grated fresh ginger
1 Carrot, shredded
6-8 Garlic mustard flower clusters for garnish

FORAGED ITEMS:
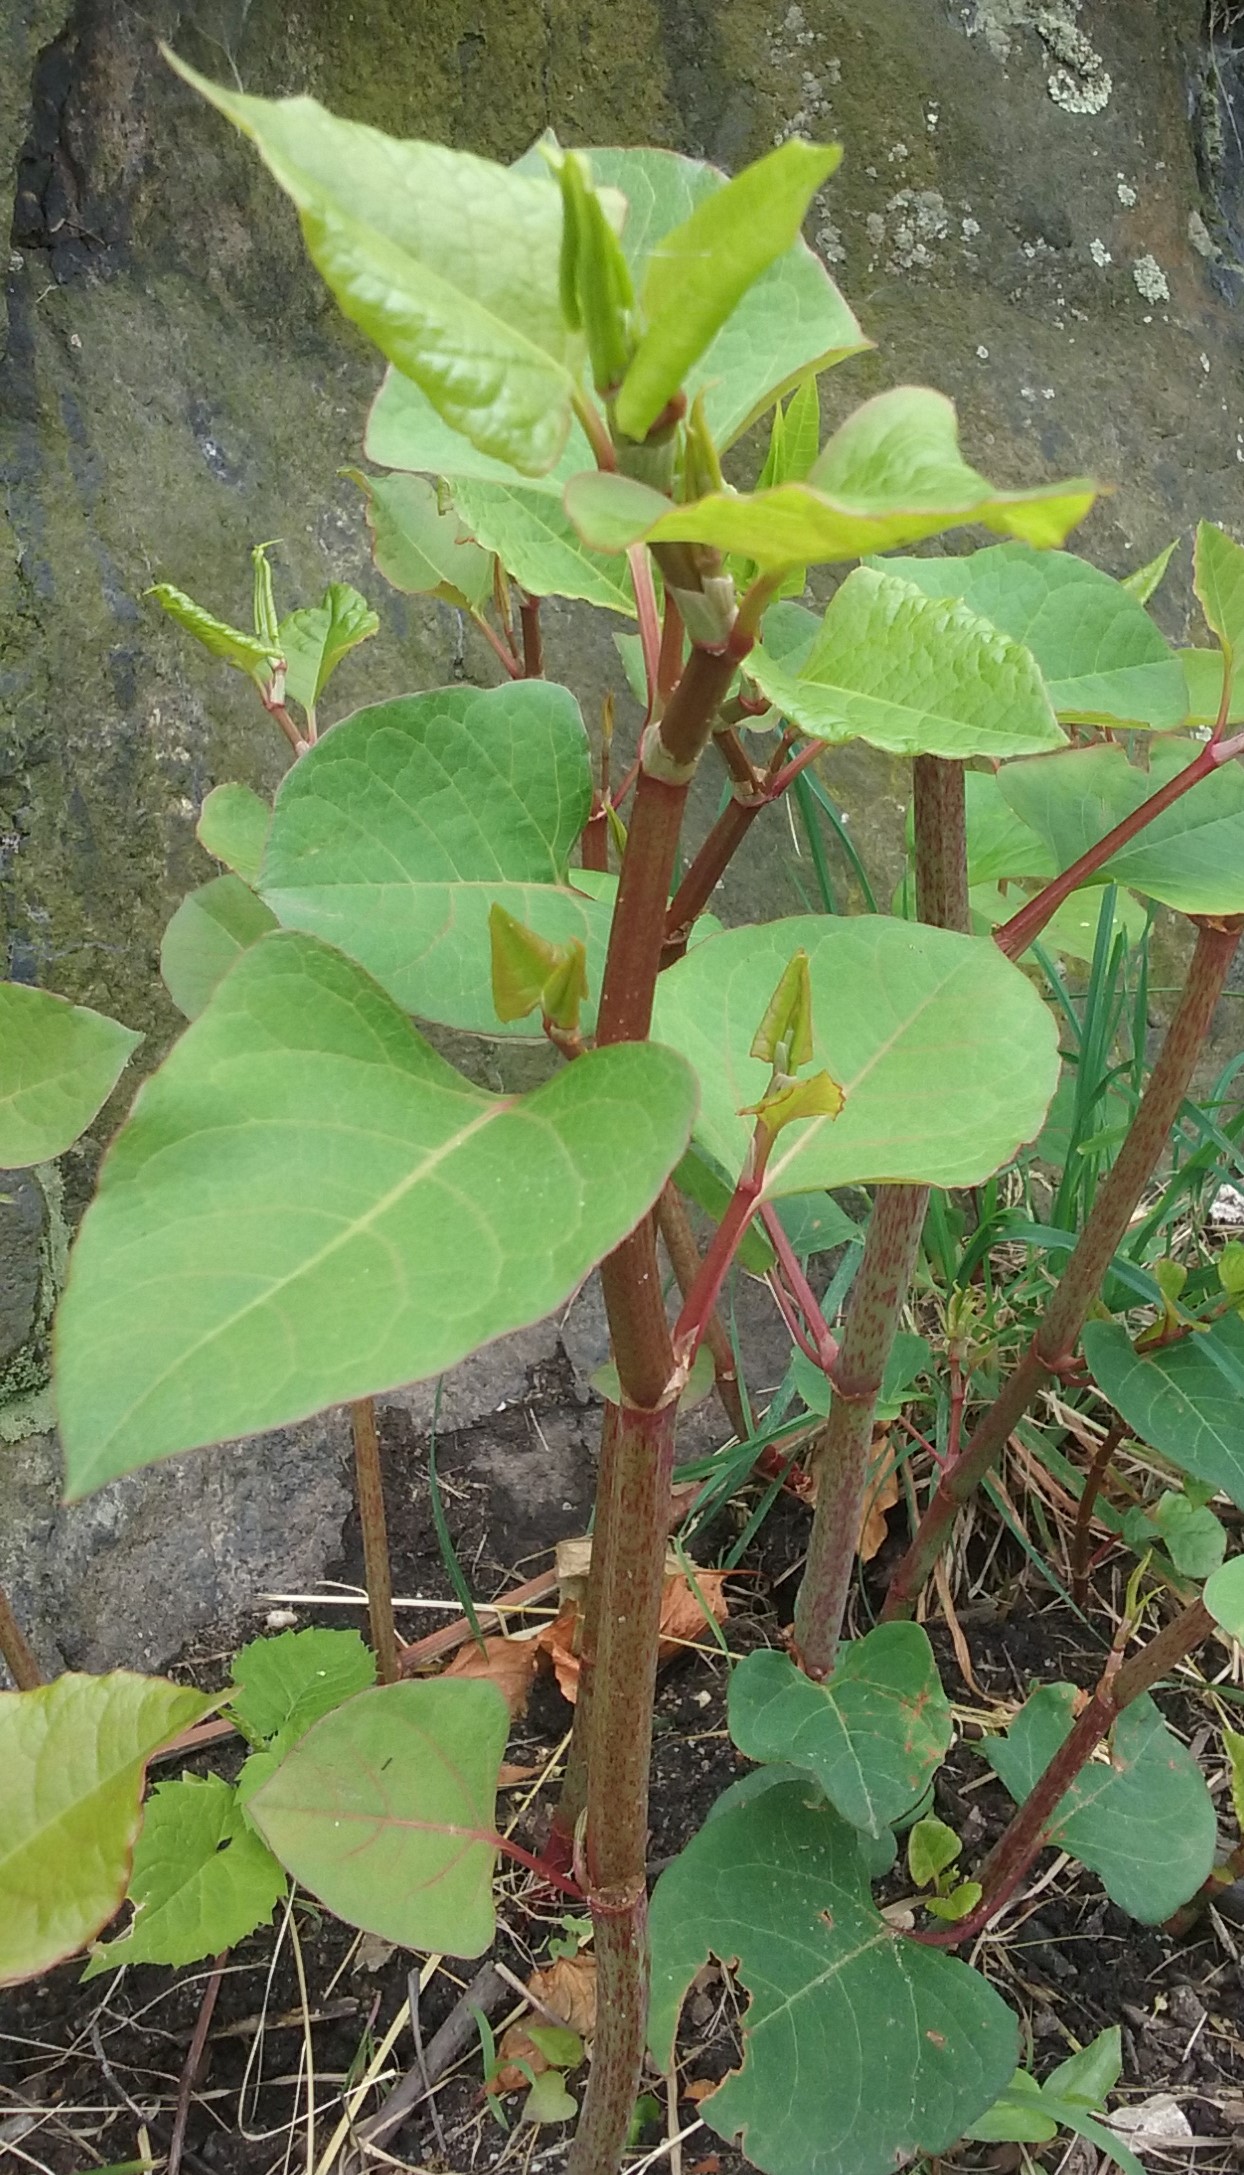
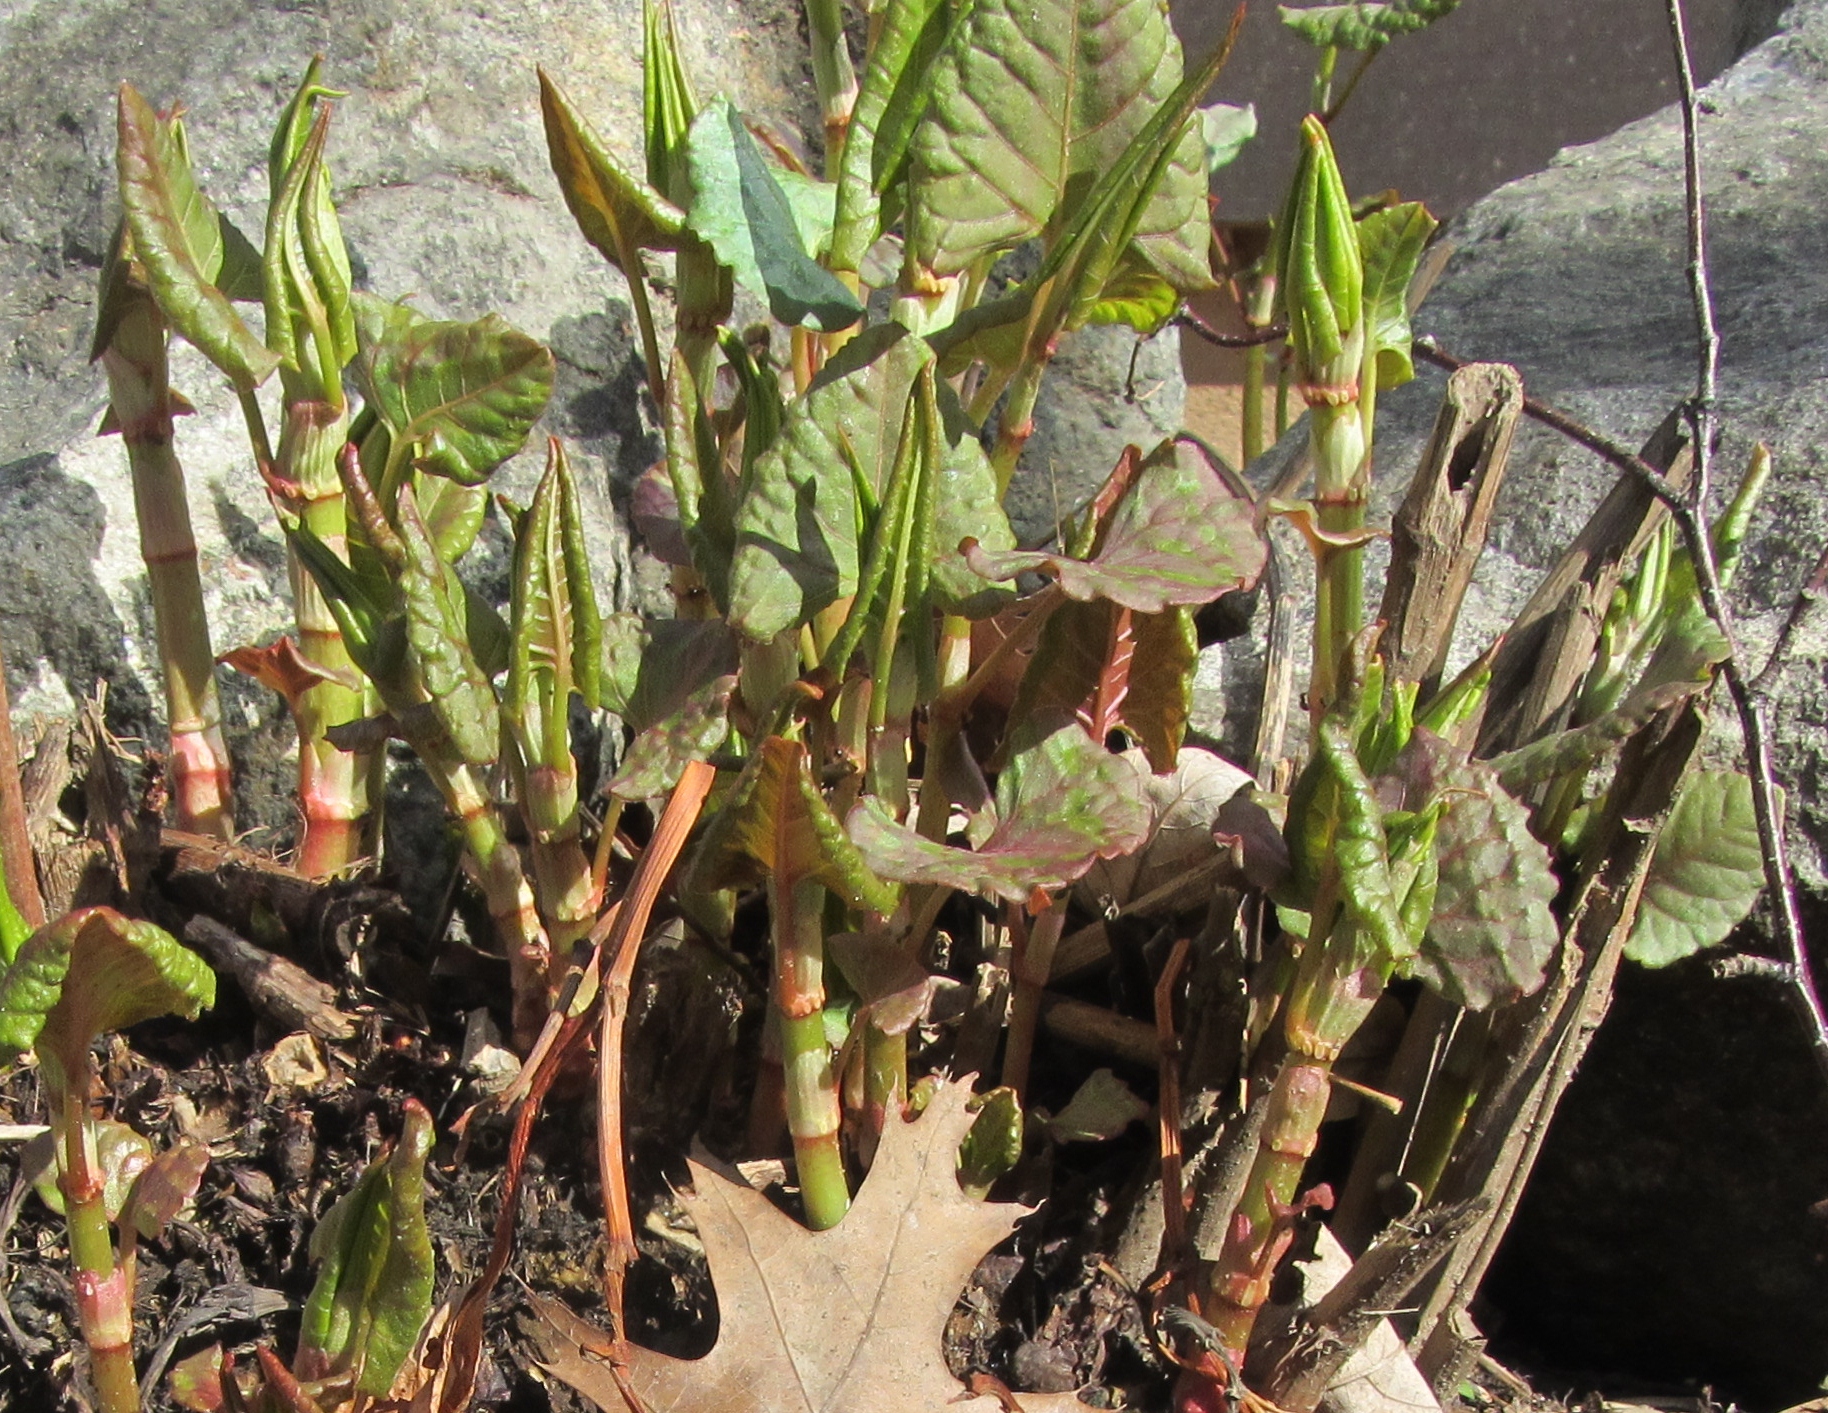
1. Japanese knotweed
2. Chicken of the woods mushroom
3. Field garlic
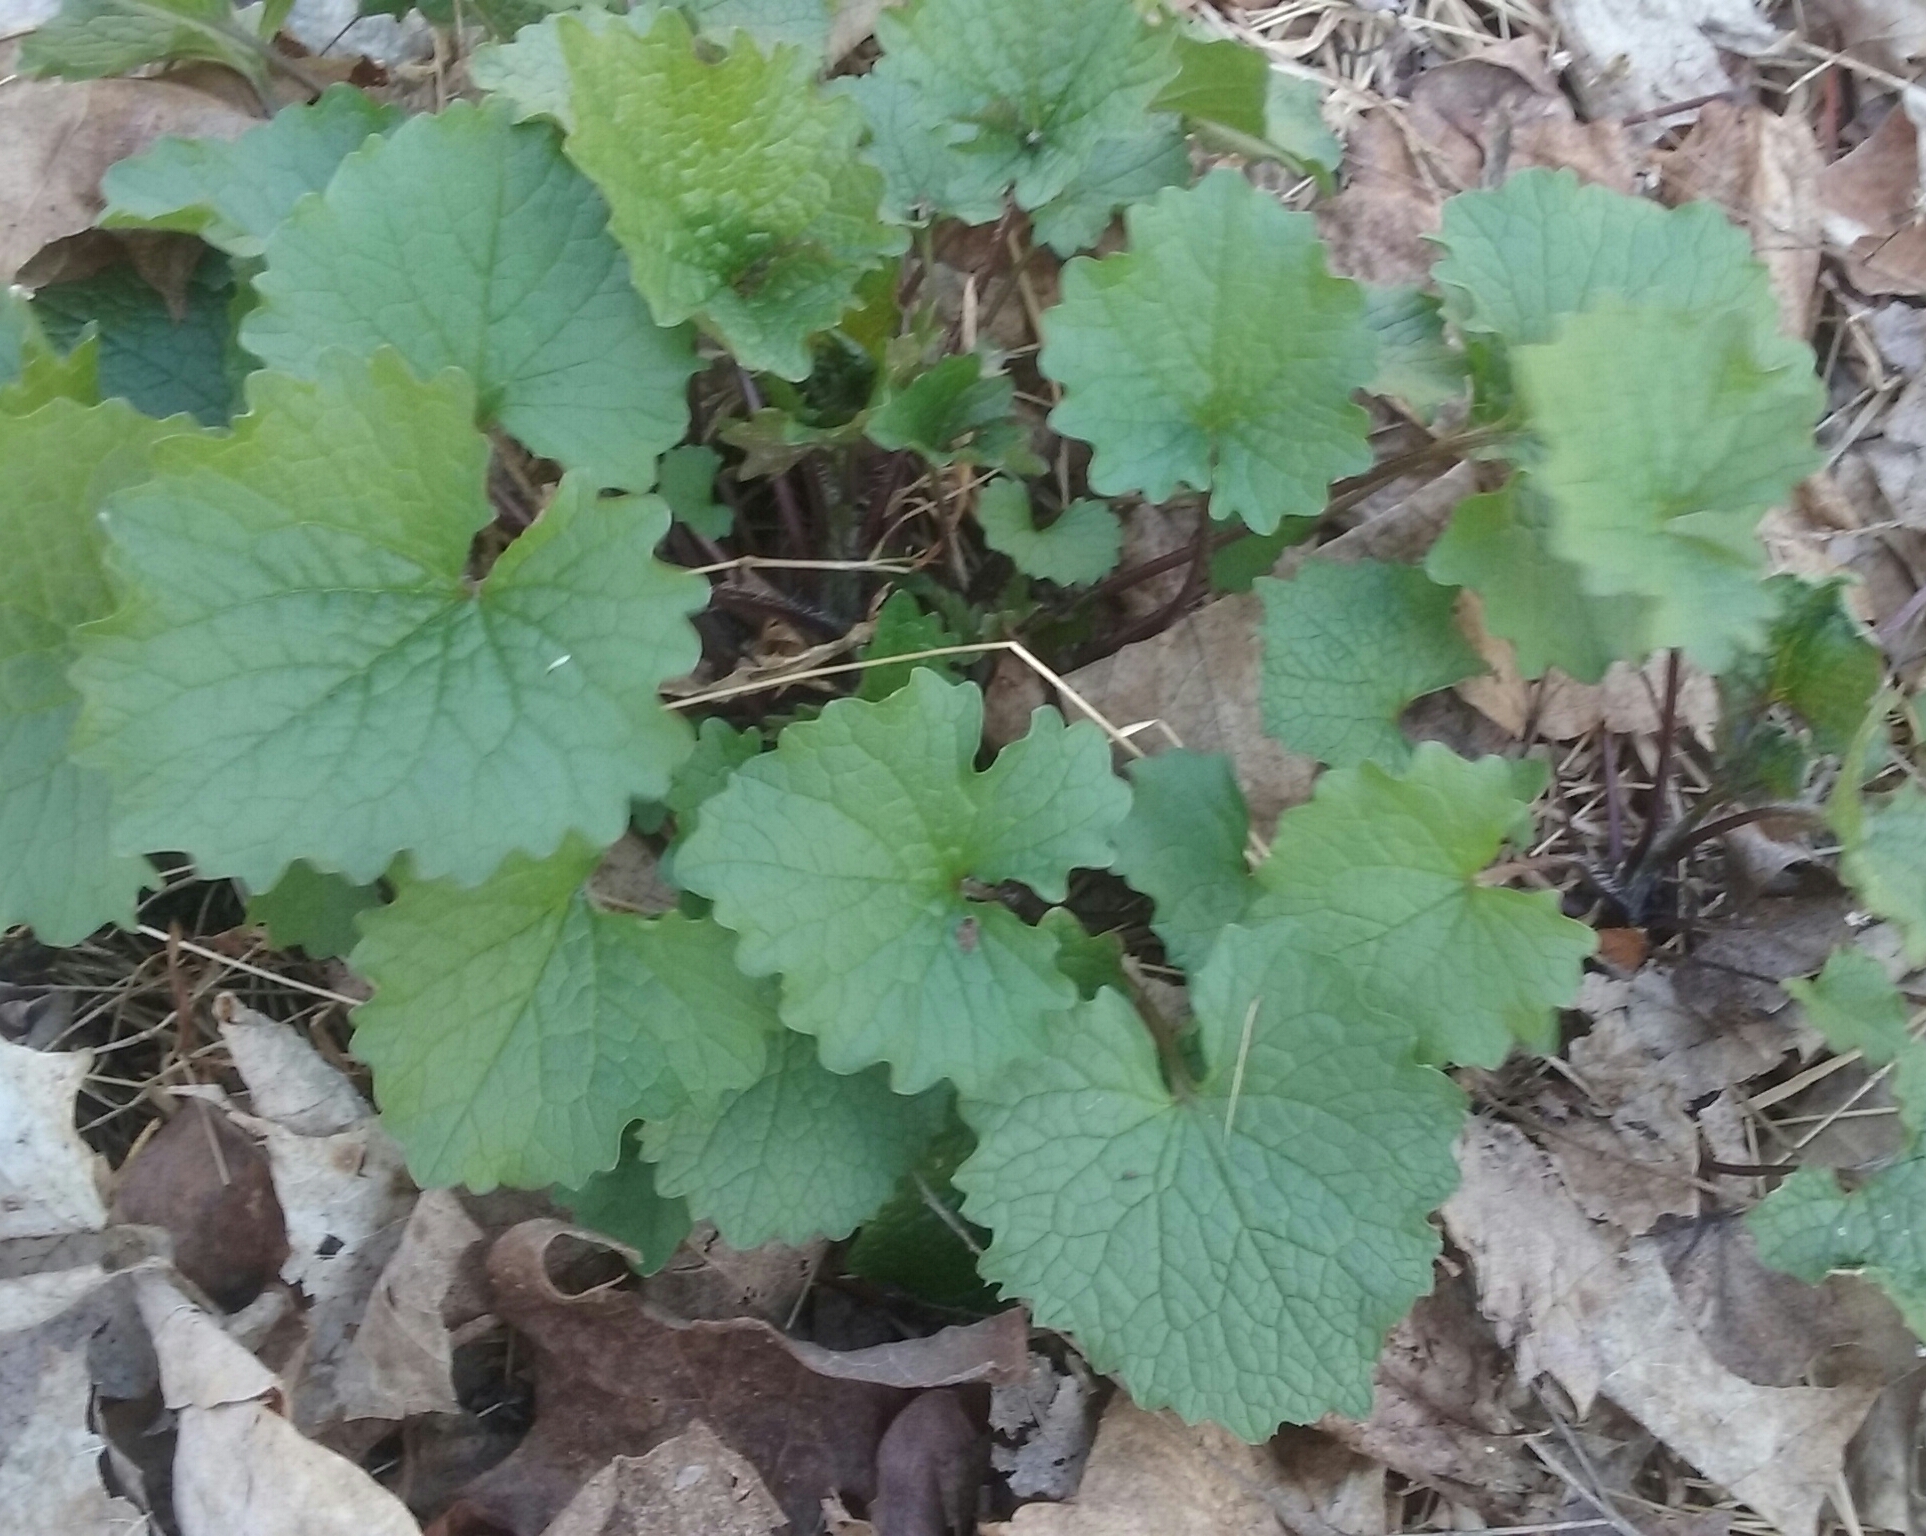
4. Garlic mustard top leaves and flower
5. Violet flowers

PURCHASED ITEMS:
1. Garlic
2. Ginger
3. Carrot
4. Sesame oil

PANTRY ITEMS:
1. Honey
2. Tamari or soy sauce

IN THE FIELD:
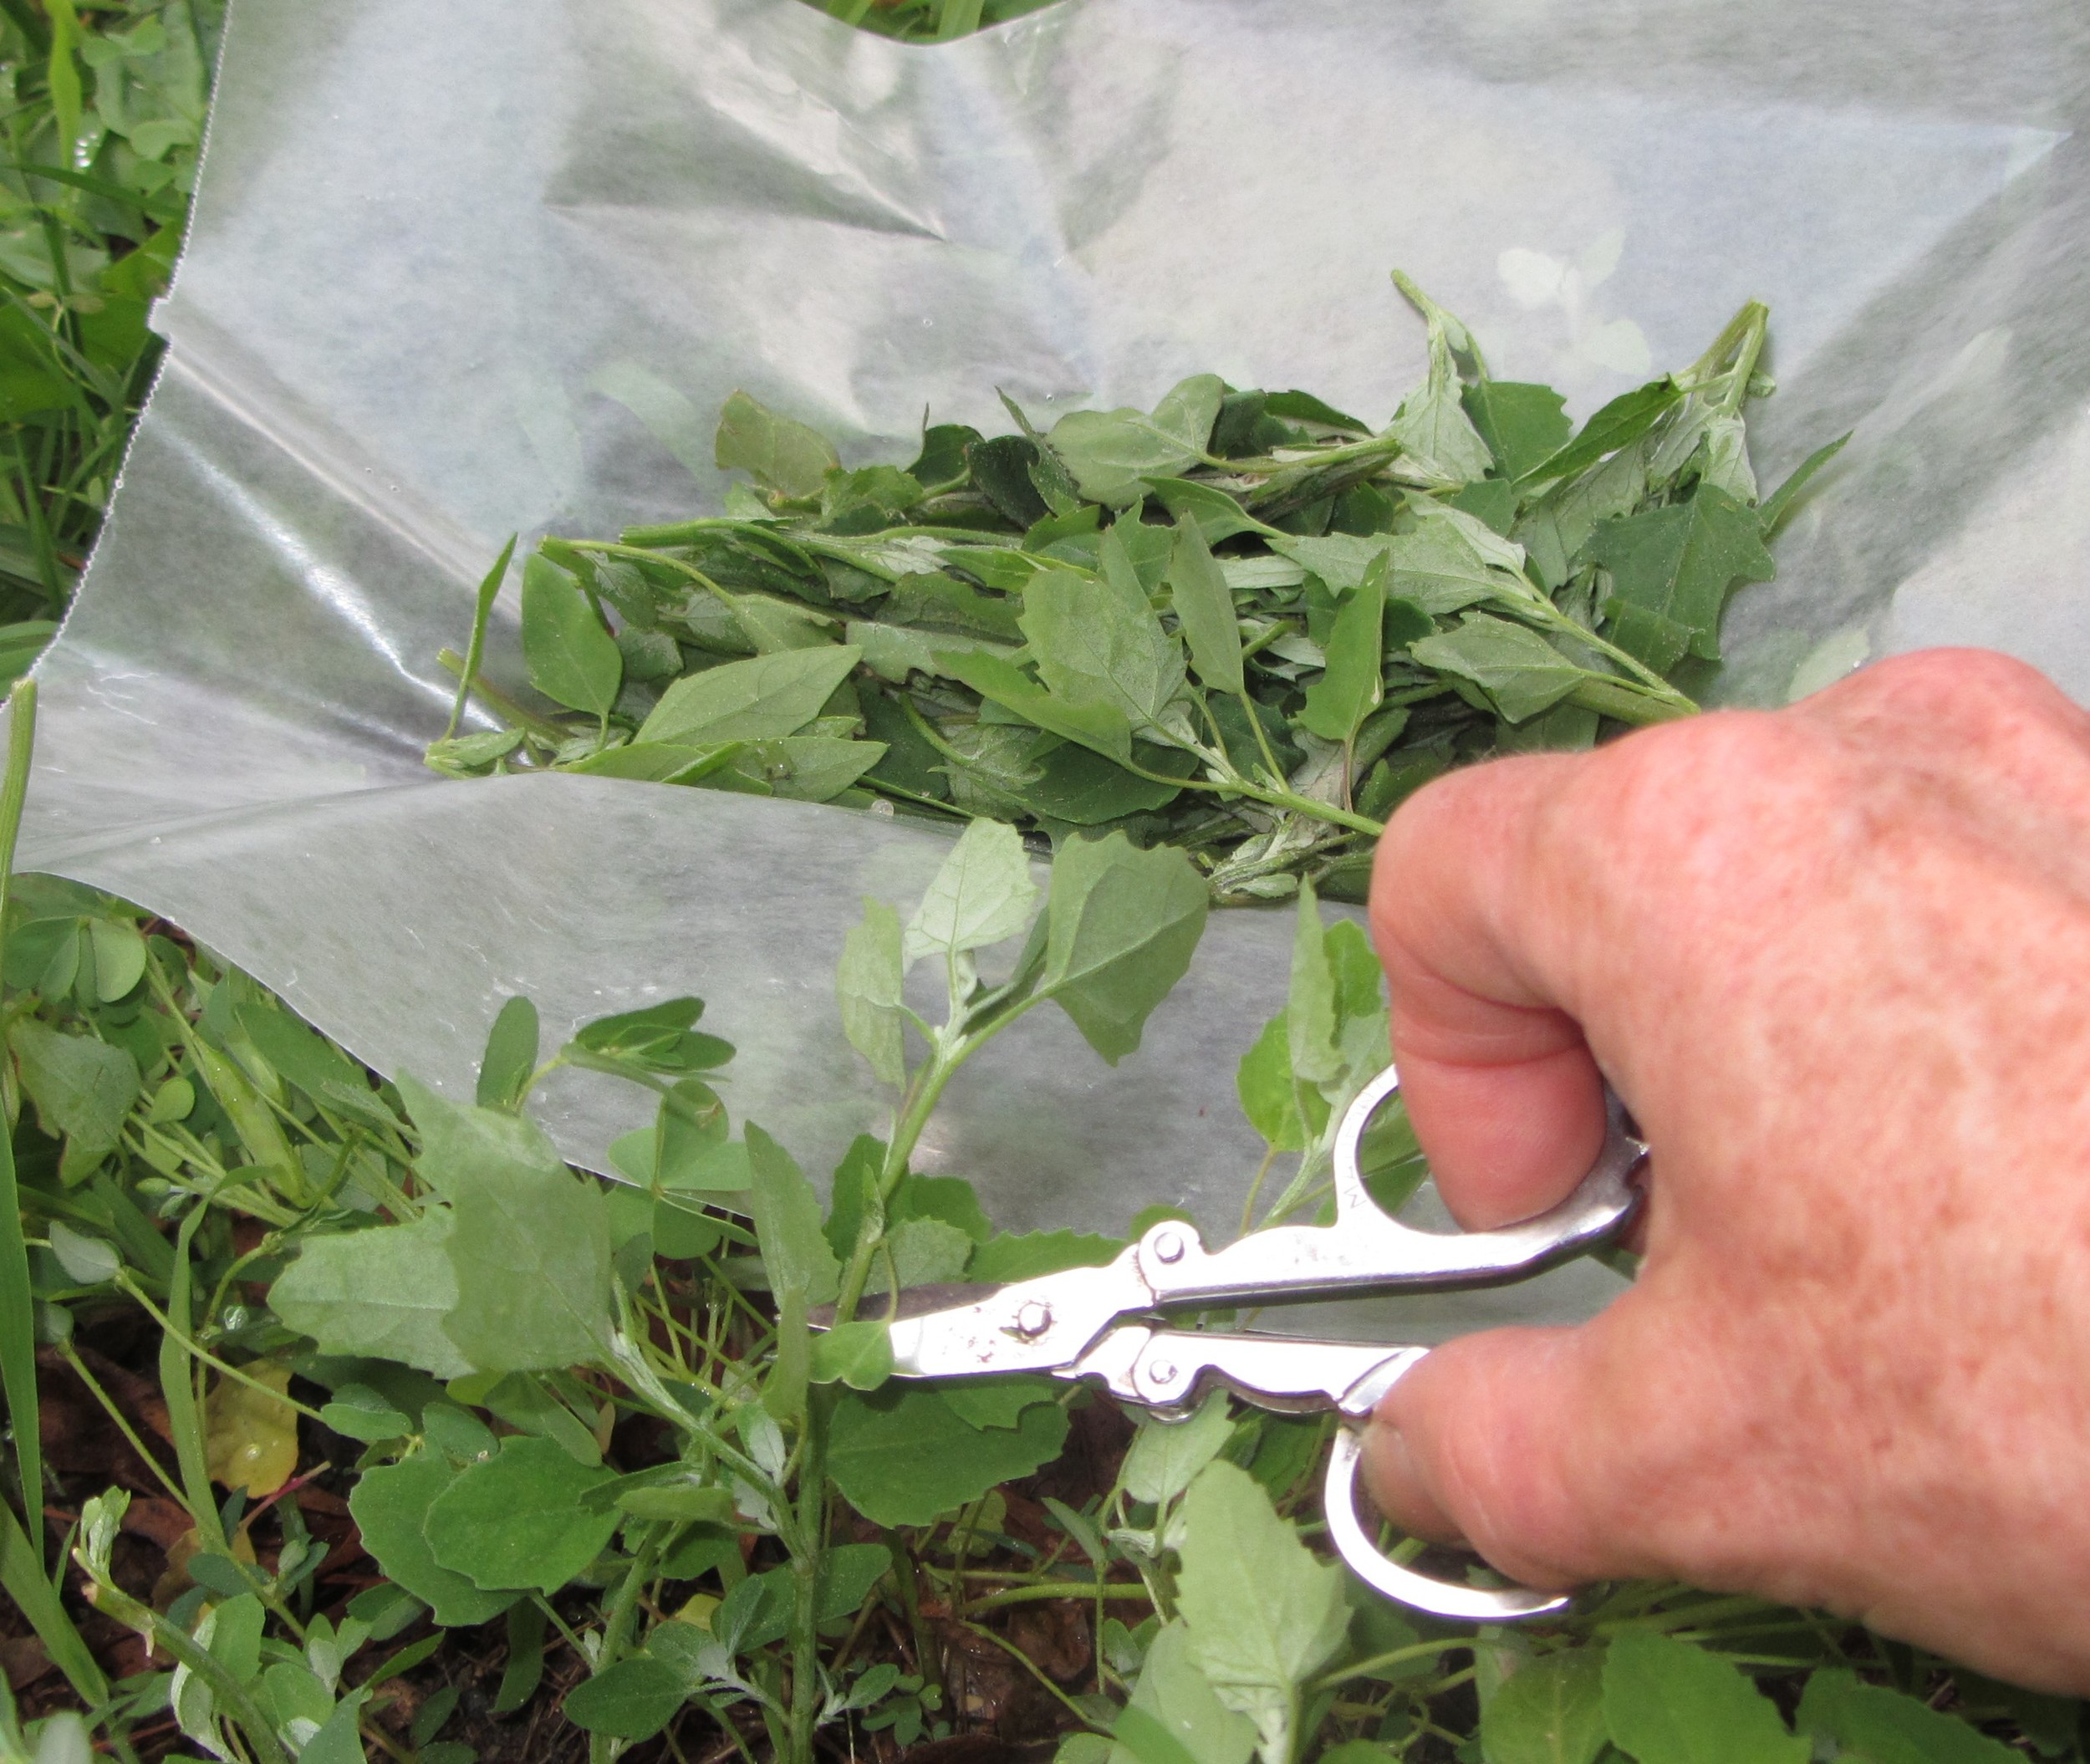
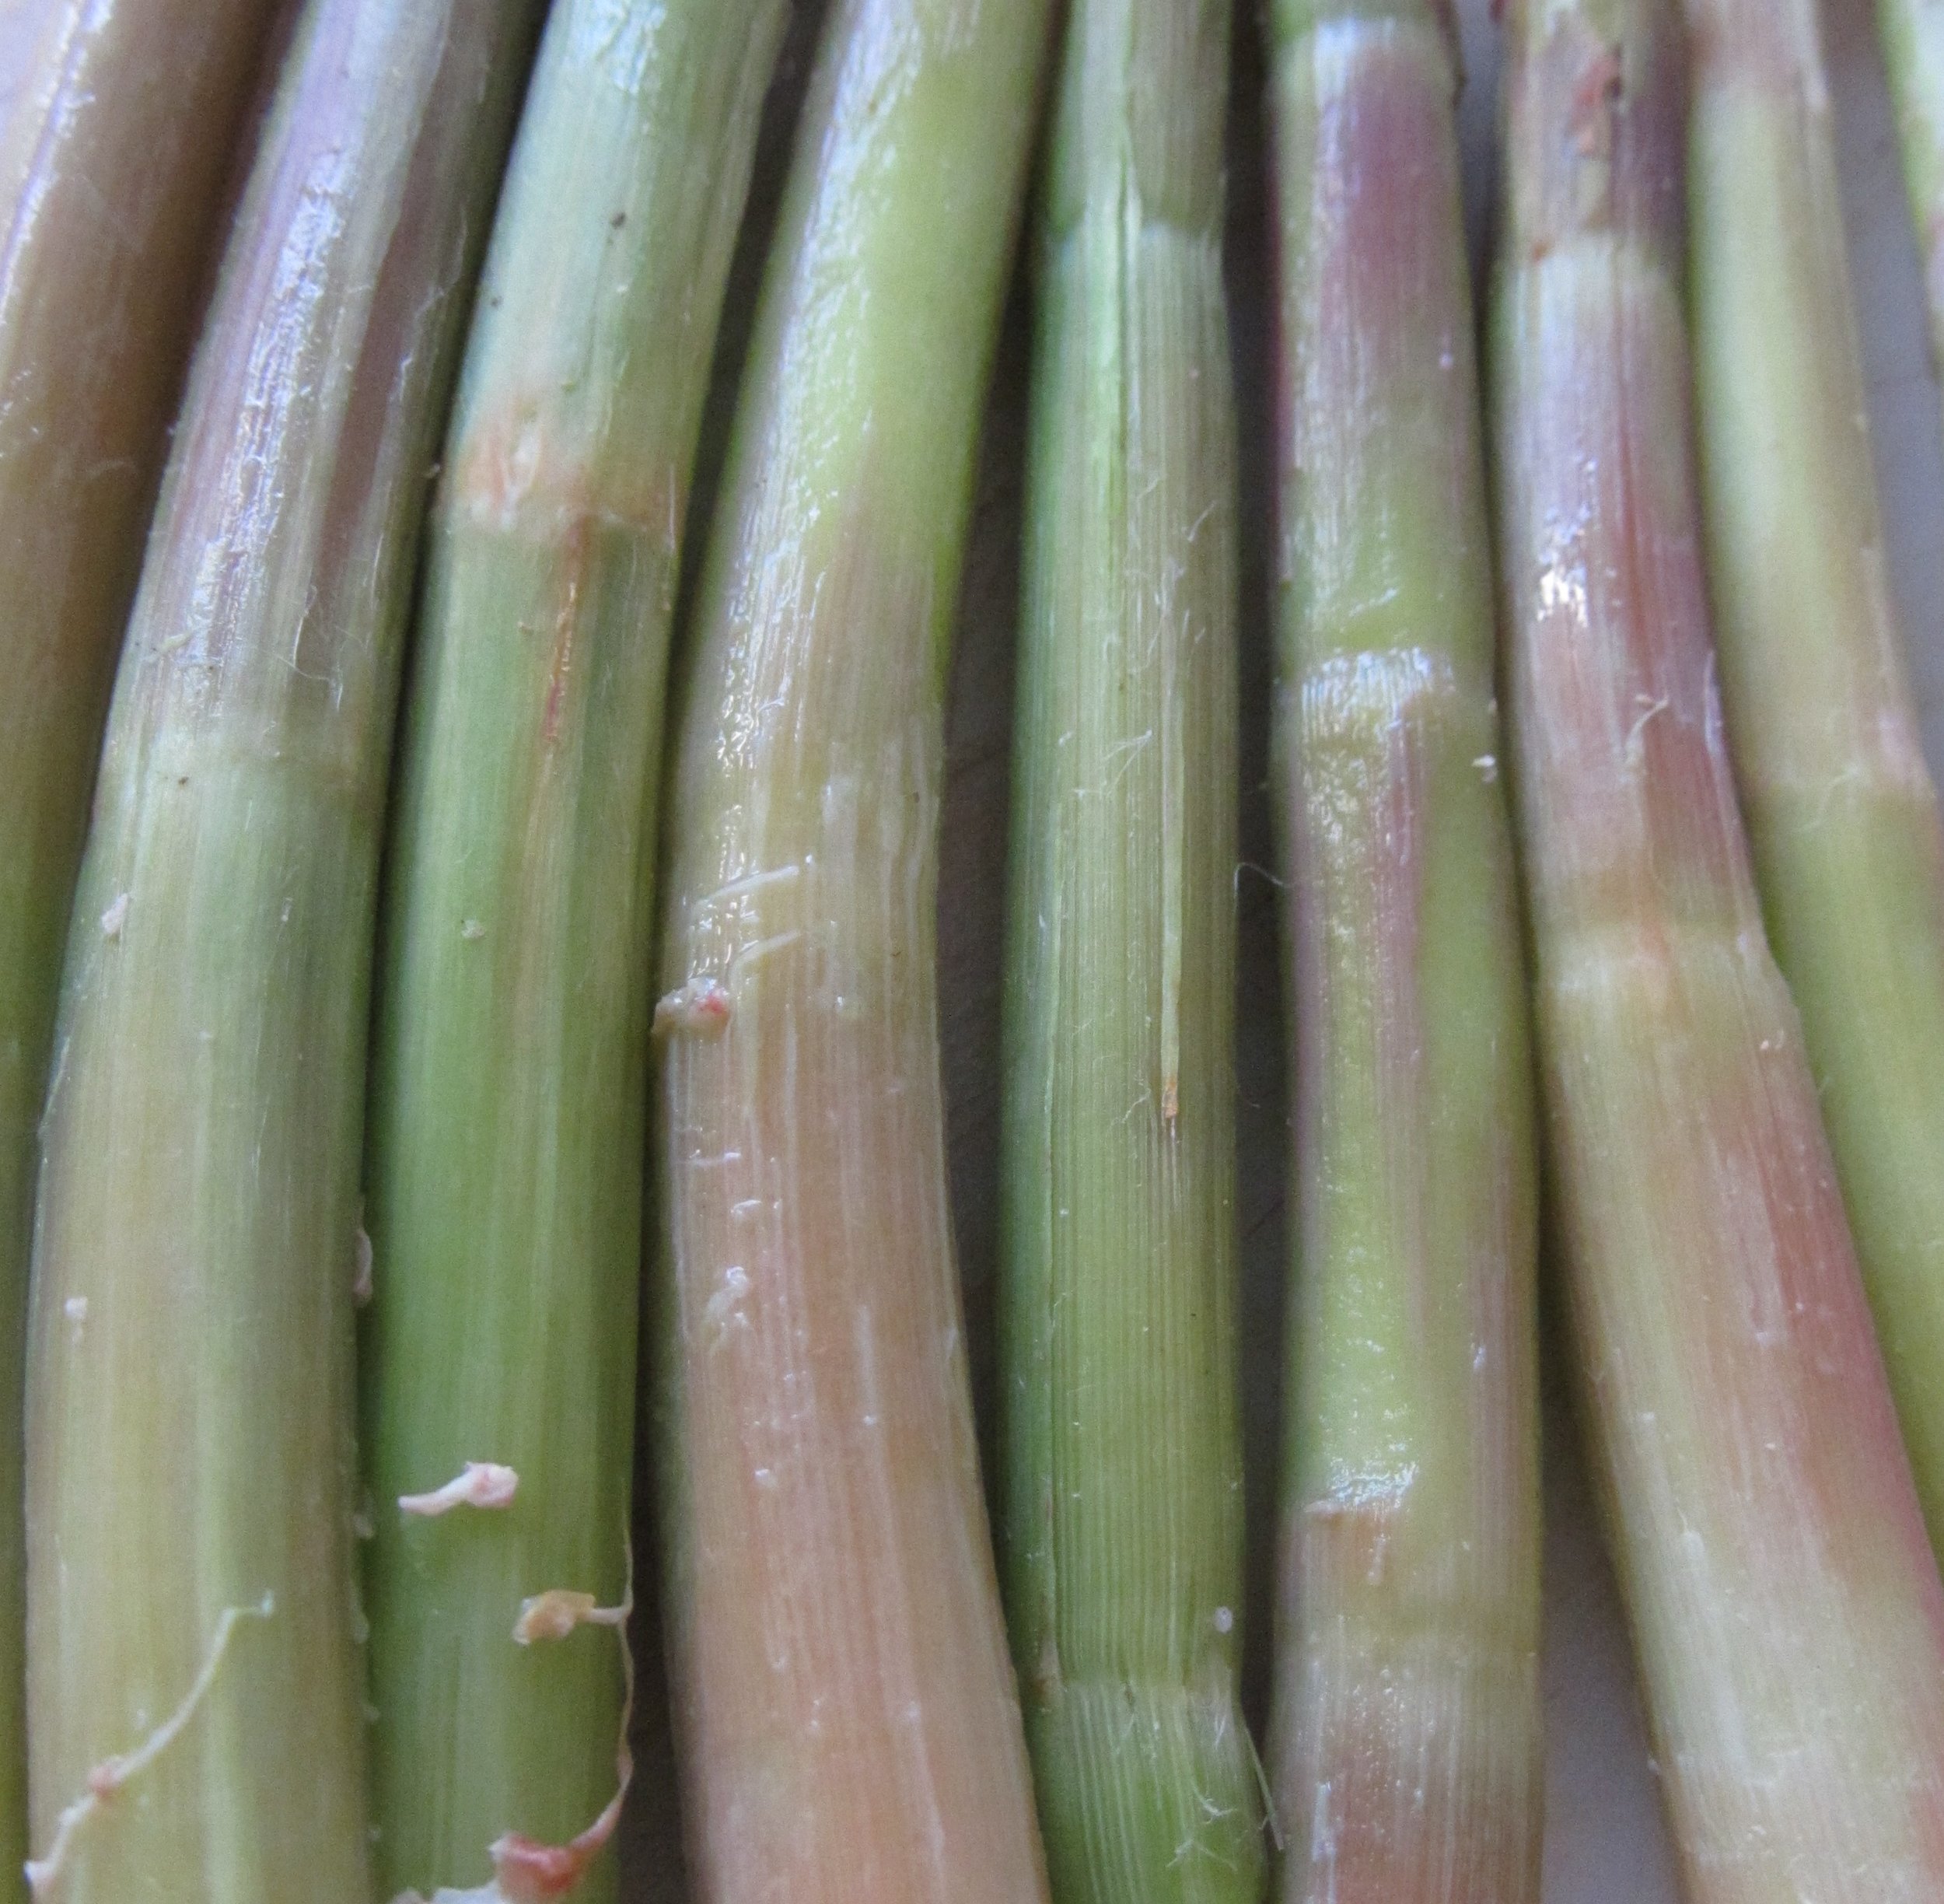
Choose knotweed stalks that are flexible, no thicker than young asparagus stalks.
Trim leaves from stalks and gather enough to fill a paper grocery bag
That should yield about 4 cups

If you are lucky enough to find fresh chicken mushroom, and/or field garlic harvest them both.
Keep an eye out for garlic mustard leaves and flowers and for violet flowers - both for plating and garnish

IN THE KITCHEN
1. Rinse knotweed and peel the thin outer layer
2. Slice knotweed crosswise or at an angle into bite-size pieces
3. Grate ginger
4. Shred or grate raw carrot
5. Clean chicken mushroom with a damp cloth or paper towel
6. Cut mushroom into bite-size pieces
7. Chop field garlic (or onion) and sauté until golden
8. Add chicken mushrooms, cooking until they release, then reabsorb moisture
9. Whisk oil, honey, tamari and ginger until blended
10. Add knotweed and carrot and mix again
11. Add cooked ingredients and blend until everything is coated

Line serving dish with garlic mustard leaves
Use a slotted spoon to cover with knotweed mustard salad
Garnish with violet flowers and garlic mustard flowers

Serve warm or chilled

Note:
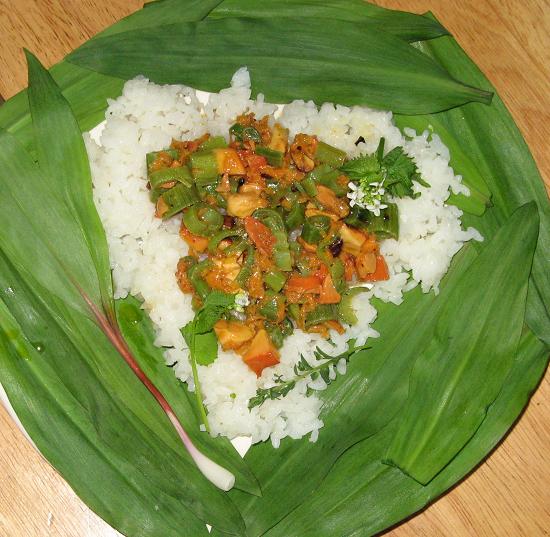
When I took this photo, I had hit the forager's lottery also finding wild ramp leaves. I made rice and served this as a main dish, instead of a side dish. Knotweed can be savory or sweet, as in this recipe for knotweed compote.

Side Dishes

Garlic Mustard: An Early Spring Arrival

My mentor, Gary Lincoff, professional botanist and author of the Audubon Field Guide to North American Mushrooms, cautioned his students not to be a ”plant snob.”

Garlic mustard is invasive, choking out native plants. But it is edible.

I will never get tired of saying that what I like best about foraging is that so many edible plants grow in abundance without any help from me.

I grew up on a farm. Planting, weeding, watering and harvesting are hard work. Foraging is fun.

Garlic mustard is one of the ten featured plants in my e-book, Joyful Foraging: Learn How to Feast on the Food Growing All Around You. Take a close look at the heart shaped leaves with scalloped edges and deep veins.

These are tastiest before the weather warms up. Once the white flowers appear, the leaves become bitter
While you're in the field, look for field garlic pictured on the right, also featured in my e-book.

Meanwhile enjoy this recipe for garlic mustard with sesame oil:

SHOPPING LIST:

Foraged items:
1. Garlic mustard greens
2. Field garlic, if you find it

Purchased items:
1. Sesame oil
2. Onion - if you don't find field garlic

IN THE FIELD:
Gather enough greens to fill a paper lunch bag
If you find field garlic, gather it to use instead of an onion

IN THE KITCHEN:
1. Rinse greens to remove any dirt and blot dry
2. Coarsely chop leaves
3. Bring 2 cups of water to a boil, add chopped greens
4. Boil for 10 minutes or until the water is bright green
5. Remove from heat, drain leaves and discard water
6. Chop field garlic or onion
7. Sauté until golden
8. Stir in cooked garlic mustard greens

Remove from heat, plate and serve

garlic mustard sesame oil 003.JPG

Wild Edible Basics, TJF Originals

Foraging Wild Edibles in Your Neighborhood

Why work so hard to forage, when we have farms? Harvesting is the only way to get the freshest produce.

Unless you live on a farm, the only way to make the field to table short is to forage. To get to market, farmers have to harvest produce hours in advance, then load their vehicles, travel from farm to market site and then unpack the vegetables people come to buy.

Try this:

In the field, harvest a few leaves, blossoms or fruit leaf, flower, or fruit.

Taste one immediately. Save the other and taste it later.

How were the flavor and texture different? Did you also notice that the more you handle any fruit or vegetable, the more it gets bruised? That also impacts flavor.

Let's face it, whatever we pick and nibble in the field will taste better than anything brought home later.

Where else can you do your shopping while on a daily walk?

If you establish walking routines, you get to notice what is growing and where. Observe the life cycle of the plant, so you know where and when to find it, ensuring peak flavor whenever you take a walk. That will save time in the long run

Lamb’s Quarters Growing in a Tree Pit NYC

Lamb’s Quarters Growing in a Tree Pit NYC

Quickweed growing in a flower pot.

Quickweed growing in a flower pot.

In some urban and suburban neighborhoods residents plant flowers and vegetables. I've actually seen corn plants and tomato plants around some trees in sunny urban neighborhoods. People care about their homes and most of the time these bits of garden are well tended.

You can be sure that weeds will grow and if you are in a position to make friends, offer to help weed.

Good neighbor weeding:

First, trim the tender tops and then root out the weed. If it is not an invasive bully, why not replant that weed in your own window box if you have one? As you become better acquainted, these neighbors may be willing to let the lamb's quarters, purslane, and Asiatic day flower grow, knowing you won't let them crowd out their plants.

Now, you'll have a regular foraging place supported by your gardener neighbors.

I'm a forager in everything I do. I forage for farmed produce and household items left behind by former neighbors in addition to foraging wild foods. It's not just about saving money, it's also about keeping useful items out of the land fill.

In my perfect world, we'd all be foragers looking at our streets, roads and open spaces as places to nurture, rather than places to throw our garbage.

Is it a dream? Maybe. But in an often fast-paced, wasteful and stressful world, it's a pretty good dream.

Wild Edible Basics

Foraging Your Local Farmers' Markets

Why Forage at a Farmers' Market?

In my world, foraging is the quest for food, whether or not I'm the one who harvests the food. Farmers markets are ideal for beginning foragers. Everyone who shops there gets to:

*support local farmers and learn ways to get good value

*eat the freshest food - shortest time from field to table

*safely learn about the flavor and preparation of unfamiliar vegetables and fruit.

Looking for the best quality? Get there early.

While the farmers are setting up, it's easier to see what's available and the condition of the produce.

20190311_123407.jpg

Looking for bargains? Cruise the market late in the day.

Farmers maybe willing to negotiate price, because it's more practical to take money than to transport unsold produce.

Strategies:

1. Say "hi" to the farmer. You'll be amazed at the rewards.

Last summer, I saw lamb's quarters with pink top leaves at a farmer's stand.

This clever farmer saved the seeds from the "weeds" in her garden, replanting this wild edible in another spot. After a few years of selective breeding for pink leaves, the farmer now has enough seeds to sell to a seed company.

Imagine that! A farmer has embraced a wild edible, lamb's quarters, and cultivated it for looks. The lines between farming and foraging are already merging.

2. Walk the entire market before buying anything. Notice the condition and the price of what is available.

3. Eat samples offered. Get an idea of the flavor and texture of unfamiliar items and find new ways to enjoy what you already love.

4. Once you decide where to buy, look at everything offered. If an individual fruit or vegetable has a bruise or a bit of damage on one spot, negotiate the price.

Disclaimer: The item has to have the right texture and the right color; it can't be overripe, crushed or moldy.

Next time, we'll head out to our neighborhoods.

Drink Your Mushrooms

                       The FourSigmatic homepage

                       The FourSigmatic homepage

I love eating mushrooms, learning about mushrooms and talking about mushrooms. I was shocked when the secretary of the New York Mycological Society forwarded an email from someone looking to get in touch with me.

I will forever be grateful to Laura who told me about FourSigmatic, a company based in Finland, and put me in touch with them.

FourSigmatic blends medicinal mushrooms with coffee, cocoa or as an elixir, which is a lot more fun than taking a capsule if your goal is to embrace the health benefits of mushrooms.

Soon after I met entrepreneur/founder Tero Isokauppila, I became Mushroom Mom, sharing what I know about foraging with their dedicated customers.

Here's a link to my recent FB chat with FourSigmatic Shroom Club members: http://bit.ly/2qaXUA4

Here's a link the FourSigmatic products: https://us.foursigmatic.com/

Urban Foraging: Take a Mini-Vacation and Eat Well for Free

Wow! Has it been a whole year since I did this Savvy Radio interview with Christina Nitschmann? 

We talked a lot about healthy eating on a budget and how foraging is more than just finding free food, it's a way to create a mini vacation and meditation break in NYC's otherwise overstimulating environment.

Here's a link to that interview:

 http://www.blogtalkradio.com/savvy_business_radio/2015/08/17/jj-murphy-the-joyful-forager-on-healthier-ways-to-find-prepare-and-eat-food


Wild Edible Basics

Tender Tops: My Clean and Easy Technique for Harvesting Wild Edibles

Foraging is about working smarter, not harder. Nothing is more satisfying than coming home with enough freshly picked wild ingredients to create or enhance a recipe.

You eliminate most of the hard work by using your folding scissors or small knife to cut the tender tops of green plants like lamb's quarters, quickweed or even knotweed. You're not going to eat the more mature, tough parts of the plant anyway, so there is no need to carry that extra weight.

Take a close look at this photo for how to harvest lamb's quarters. As you can see, the scissors is taking just the top of the plant. Notice the waxed paper in the background. 

Unless you are harvesting wild roots, you do not need to pull up the entire plant. This was about fifteen minutes of work, including folding the waxed paper so my leaves stay fresh and don't bruise.

Once you are back in the kitchen, you want to make sure your wild gathered ingredients are free of pollen or insects. Sturdier leaves can be rinsed in cold water and spun in a salad spinner.

More delicate plants, like wood sorrel and Asiatic day flower blossom can be misted with a plant sprayer and blotted dry with a lint-free towel or paper towel.

That's it! 


TJF Originals, Treats

Cattail Pollen Cookies: The Joyful Forager's Truly Original Recipe

Cattails have been called nature's supermarket because every part of this plant can be prepared as food or supplies.

The pollen that forms on the male flower head has the texture of pastry or bread flour and has been used in pancake and biscuit recipes for millennia.

Searching online for a cattail pollen cookie recipe, asking fellow foragers and posting to social media foraging groups yielded no cookie recipe.

There was nothing else for me to do but embrace the opportunity, and invent cattail pollen cookies.

Find my step-by-step directions for harvesting cattail pollen after the recipe.

Once you get home, the cattail pollen has to be sifted two or three times to remove bits of seed head fluff or any other non-pollen material. But once you sift the golden yellow powder, it's ready for use. Cattail pollen has remained fresh in my freezer for over two years. If it's in the refrigerator, it gets eaten within a few weeks, not because it is perishable, but because pollen is also delicious in salads, cereal and even as a thickener for soups and stews.

Here is my standard basic cookie recipe which makes it easy to create variations on the theme: 

JJ's Basic Cookie Recipe                                                                                                                                  1/2 cup coconut oil
3/4 cups of sugar - I use turbinado sugar
1 egg
1-1/2 cups of unsifted pastry flour
1-1/2 tsp baking powder
1/2 tsp salt
1 tbs flavor:
vanilla, maple syrup, rose water, or hazelnut
1/2 cup texture:
rose petals, pecans, walnuts, butternuts, cacao nibs, dates, coconut, oatmeal

JJ's Recipe Revamp                                                                                                                         

In this recipe I did not want any flavors or textures to compete with the cattail pollen so my revamp of myself used:

1/2 cup coconut oil
3/4 cup white sugar
1 tsp vanilla
1 egg
10 oz unsifted pastry flour
2 oz cattail pollen
1-1/2 tsp baking powder
1/2 tsp salt

Timeline                                                                                                                                                                  Late Spring to Early Summer: Once a year cattails produce pollen, usually in June in Northeast part of North America. Gather pollen when you see the top male cattail heads covered in bright yellow pollen. You can store the pollen in a freezer for at least one year.

Once harvested, sift the pollen to remove any bits of fluffy cattail flower head or other material. Once sifted, store in air tight containers in the freezer.

One Hour Before:                                                                                                                                           Combine coconut oil (or butter if you prefer) and sugar. If you use white sugar, the cookie may swell in size while baking.                                                                                                                                                  Combine flour, cattail pollen, baking powder and salt.                                                                                   Add dry ingredients to wet ingredients. Mix thoroughly and let the mixture cool in the refrigerator for 20-30 minutes.

Thirty Minutes Before:                                                                                                                                          Line a baking sheet with parchment paper.
Heat oven to 300 degrees
Remove mixture from refrigerator and make walnut size balls of dough
Place on cookie sheet and flatten to about 1/4 inch thick

15 Minutes Before:                                                                                                                                               Put cookies in preheated oven and bake 10 - 15 minutes, until underside of cookie is golden brown.           Remove from oven and let cookies cool before putting them on a dish.                                                       Serve and enjoy!

How to Harvest Cattail Pollen                                                                                                                       What You Will Need:                                                                                                                                    -Long thin bags, like a paper baguette bag
-Waders or other footwear to wade into wetlands
-Cattails growing in an area with no visible signs of pollution

Cattails typically grow in dense clusters, which makes foraging easier, but they grow in wetlands, marshes and other moist areas, which makes foraging a bit more of a challenge.

Cattails are part of Nature's clean-up crew, so look for a stand of cattails in an area that is not near a waste treatment plant or other industrial activity.

The brown cigar-shaped seed head is an unmistakable identifying feature of cattail. In the winter, these brown seed heads turn into a white fluff, which makes it easy to locate a stand of cattails before the tender shoots emerge in the spring.

Some people create small ponds as part of the landscape design on their property. It's possible to transplant the cattail rhizomes and grow them in these ponds.

When it comes to collecting cattail pollen, if you listen to the prevailing advice and shake the pollen into a paper or plastic bag, some of the pollen will land in the bag. A lot more will fly in to the air and land on you. A better strategy is to cover the entire flower head with a
bag and cut the flower head. Those long slender bags that baguettes come in work very well for this purpose.

There is a very short window of time when the pollen is available for collecting. Some years you only have a few days. Look for the fattest seed heads for the most pollen.

Once you have collected a number of seed heads, you will need to bring them home and sift the pollen to remove and fibers or insects. The pollen can be eaten raw sprinkled on salad, cereal or added to yoghurt. It can also be added as a thickener to soups and stews.

Some people claim it can be used as a substitute for saffron. That may be true for the color, but cattail pollen has a delicate flower taste. The fewer ingredients in the cattail pollen recipe, the more you will be able to taste the delicate cattail pollen flavor.

The pollen has no leavening agent, so when baking with it, you need to mix it with flour.

Whether you make pancakes, biscuits or cookies, the color of the dough will be a dazzling sunshine yellow.


Cocktail Revamps

Cocktail Recipe Staples: Knotweed+Wild Flower Syrups

                                   Raise the flavor profile of your craft cockt…

                                   Raise the flavor profile of your craft cocktails with fresh, wild edible syrups

These easy to make, sweet syrups will add a burst of fresh flavor to many cocktail recipes.

Pantry Items                                                                                                                                      
4 cups distilled water
1.75 cups sugar

Foraged Ingredients                                                                                                                                          2 pounds knotweed, peeled and chopped
1 cup wild blueberries

Prepare the Ingredients
Place cleaned, chopped knotweed in a saucepan
Cover with water, bring to a boil
Reduce heat and simmer for 15 minutes
Add blueberries and simmer another 5 minutes
Remove from heat
Strain through fine mesh strainer into a clean saucepan
Add sugar to the strained liquid
Bring sugar and liquid to a boil
Lower heat and simmer until sugar is dissovled, stirring constantly
Pour into glass jars or bottles.
Refrigerate.

Simple Wild Flower Blossom Syrup

Flowers add color and flavor to many recipes. Here's my basic simple sugar recipe which can be used for many wild and cultivated edible flowers.

Pantry Items                                                                                                                                                       Equal parts sugar and distilled water

Foraged Items                                                                                                                                                    Blossoms in amount equal to sugar and water

Prepare the ingredients
Bring sugar and distilled water to a boil, remove from the heat
Stir in three cups of loosely packed wild edibles until coated
Let mixture steep overnight.
The next morning pour the syrup through a strainer and save for later use

Beverages

Rose Hip Tea: A Vitamin Rich Drink

My childhood memories of snacking on rose hips, the only berries around in winter, are that they were a delightful trail nibble, with a texture like raisins. It would be decades before I understood that rose hips are a free source of vitamins and a versatile wild food source.

After the wild roses have lost their blossoms, the bright red berries, called rose hips, can be harvested fresh in autumn or dried, actually freeze dried in winter. Rose hips contain more Vitamin C than citrus, and are also rich in Vitamins A, D and E.

                        Rose hips naturally freeze dried by winter

                        Rose hips naturally freeze dried by winter

The fine hairs and seeds in fresh rose hips are not only an unpleasant texture, but it can also irritate the mouth. I wait for Nature to do the work of freeze drying rose hips. One night of below freezing temperatures turns rose hips into a delicious wild food. This is another situation where knowing when to harvest is the difference between having fun and doing chores. The easiest way to enjoy winter gathered rose hips, besides simply snacking on them, is to make tea.

One note about cooking with rose hips: I only use cast iron cookware, but if I had aluminum pots, I would not use them to prepare rose hips, because aluminum destroys the Vitamin C.

When it comes to any kind of berry, different individual bushes produce different tasting fruit. When I find a rose bush with wonderful tasting rose hips, I'll harvest the berries from that bush. Once home, put a pot or kettle of water on the stove and clean any twigs or other items from the the rose hips. When the water comes to a boil, remove it from the heat. Use 2 teaspoons of dried rose hip per cup of boiling water and steep for 10 to 15 minutes. After making tea, push the rose hip pulp through a strainer, add olive oil or butter and enjoy as a side dish.

Timeline
1-2 Hours Before:
Harvest rose hips
20 Minutes Before
Put water on to boil
Clean and sort rose hips, removing any stems.
15 Minutes Before:
Remove water from heat and steep rose hips
Serve

Shopping List
Foraged items:
Dried rose hips two teaspoons per cup of tea
Pantry:                                                                                                                                                                                                           

Honey, sugar or other sweetener for tea
Olive oil or butter for side dish
Pot or kettle to boil water
Strainer

Side Dishes

Dandelion Croquettes: A Hot and Crispy Side Dish

 Dandelion Croquettes are a crispy substitute to starchy side dishes

 Dandelion Croquettes are a crispy substitute to starchy side dishes

When I was growing up, the sight of sunny yellow dandelion blossoms decorating a lawn or pasture was a sure sign that winter and mud season were over. Spring, with all its promise of longer, warmer days and new growth, had officially arrived. Dandelion blossoms, when separated from the milky stems, can be enjoyed fresh, sprinkled over a green salad. Blossoms can be also be added to a number of recipes. I like to sprinkle petals in pancake batter. If you are skilled at making tempura, dip entire blossom in tempura batter. Here's my recipe for dandelion croquettes:                                                                                                                                                                                                                                                             

1 cup dandelion flowers - pinch the flower at the bottom, roll it & shake off the petals
1/2 cup flour
2 cloves garlic, minced
1/4 cup chopped onions
1/4 tsp dried thyme
1/4 tsp dried basil
1/4 tsp dried oregano
pinch fresh ground pepper
1 oz milk
oil for pan frying
Mix all ingredients
Add enough milk to make a stiff batter
Heat coconut oil or olive oil in a cast iron pan
Spoon golf-ball size amount of batter into the oil
Press into a flat shape for more even cooking                                                                                    Let  croquettes cook 3 or 4 minutes until golden brown
Flip croquettes and brown on the other side                                                                                                Remove from pan and drain
Serve on a bed of ramp leaves or other greens.                                                         
                                                                                                                                                                   Shopping List:
Foraged items

1 cup dandelion blossoms separated from stem
12-15 ramp leaves
Pantry Items:
1/2 cup flour
2 cloves garlic, minced
1/4 cup chopped onions
1/4 tsp dried thyme
1/4 tsp dried basil
1/4 tsp dried oregano
pinch fresh ground pepper
1 oz milk
oil
large lettuce leaves if you don't have access to ramps
 

Timeline:                                                                                                                                          
1-2 Hours Before:
Gather dandelion blossoms
Only gather ramp leaves in season
30 Minutes Before:
Remove petals and separate dandelion petals
Mix ingredients to form batter
10 Minutes Before:
Heat cooking oil
Spoon batter into oil and press to flatten
Turn and cook the other side
Drain on paper towel
Arrange on bed of greens
Serve

Wild Edible Basics

Japanese Knotweed: Myriad Uses, Amazing Flavor

                         Freshly foraged Japanese knotweed

                         Freshly foraged Japanese knotweed

If you like rhubarb, then Japanese knotweed is for you. Not everyone has access to a fresh rhubarb patch, but Japanese knotweed is one of those invasives that spreads faster than you can harvest and eat it. Japanese knotweed is tender for about three weeks before it becomes too tough to be worth harvesting. Gather as much as you can in that time, and use it in salads, sauces, compotes, jams, pies and every way you would use rhubarb. In the field, the segmented Japanese knotweed stalks look a lot like bamboo making it easy to recognize, although the leaves of these two unrelated plants are different. The best knotweed stalks are flexible and less than 12 inches high, about as thick as asparagus. I like to cut them 1-2 inches above the ground and trim off the tips and leaves while in the field. Once I get them home, I'll peel the outer skin. Early in the season, I cut them up and marinade them before adding them to a knotweed mushroom salad. You can simply peel them and freeze them for later use without having to blanch them in boiling water. I actually prefer to peel, cut and cook the knotweed until it has the consistency of applesauce. You can strain this for a smooth consistency or incorporate the stringy pulp into your recipe. Cooked knotweed has a greenish yellow color, so to make it prettier, I usually add frozen blueberries, which turns it a lovely purple color. My personal preference is for the texture of rustic cut, rather than diced or finely chopped ingredients. I like to peel and cut very ripe apples and pears in to the knotweed blueberry mix and cook everything over low heat, adding water as needed until the fruit mix is the consistency of chunky applesauce. This basic fruit mix can be flavored using cinnamon and cloves, or ginger, or any flavor you prefer.

Timeline
1-2 Days Before

Harvest asparagus-size shoots 1"-2" above the ground
Trim tops and leaves
Peel the smooth outer skin from the stalks
Cut into bite size pieces and freeze what you do not use immediately
For fruit mix, combine in a saucepan:
2 cups knotweed pieces
1 each – apple and pear cut into pieces
1 cup frozen wild blueberries
1/3 cup oats
1/4 cup maple syrup
1/2 tsp vanilla
1/4 tsp cinnamon
2 ounces water
Bring the mix to a boil, turn down the heat to simmer. Covered the pan so the steam escapes, let everything cook 15 minutes. Add another half cup of water and simmer until all the ingredients are soft. Strain mixture for a smooth texture or leave it as is for a chunky texture. Refrigerate what you will eat in the next seven days. Freeze any excess for future use.
Serving options:
Add to yoghurt, ice cream, hot cereal.
Freeze in ice cube trays - insert a popsicle stick before freezing.
As a pie filling
As a side dish
                    

Shopping List:
Foraged Items:

Enough knotweed shoots to yield two cups per recipe
Pantry Items:
Apples, pears, blueberries, or any ripe fruit
Oatmeal - quick or old fashioned
Maple syrup
Vanilla
Cinnamon
Ginger                                                                                                                                                             

Beverages

Birch Beer: A Refreshing, Non-Alcoholic Drink

                          Birch Beer is a non-alcoholic beverage

                          Birch Beer is a non-alcoholic beverage

Winter is typically a slow season when it comes to foraged plants. Deciduous trees, the ones that lose their leaves, are at rest in the winter. When it comes to some of the birch trees, this is exactly the right time to harvest the flavorful cambium, the layer between the inner bark and the wood, for a delicious beverage. It is much easier to identify trees when their leaves emerge and when they form flowers and seeds, but winter is a great opportunity to see how the branches grow and what the structure and shape of the tree looks like. Most birch trees have a distinct bark with horizontal markings called lenticels and outer bark that peels in wide strips, making them easy to recognize even without their leaves. Older trees may have darker bark, but you can see the distinct silvery quality of the bark in younger branches. The inner bark of yellow birch and black birch smell like wintergreen when you scratch it. The stronger the smell, the better the birch beer will taste.  

   
Black birch trees can be mistaken for cherry trees - the bark in both look similar. Only the birch tree smells  like wintergreen. You do not need to peel the the bark from the trunk. In fact, if you did peel the bark completely around the trunk in a circle, you would kill the tree. No, all you need is a few smaller twigs, which can be trimmed with a pocket knife. Often, after a storm, you'll find broken branches in perfect condition for collecting the cambium. Two small, fresh branches growing as far from the trunk as possible, 8-10 inches long and 1/2-inch to 1-inch in diameter, would be enough to make 2-3 quarts of strong birch beer.

Prepare the Birch Bark Shavings
Fill a 2-3 quart container with room temperature drinking water.
Have a cookie sheet handy to collect the pieces that fall as you scrape the cambium.
Cut the outer bark from the branch, exposing the green inner bark.

This is a photo of the shaved inner bark and cambium from a black birch. The idea is to scrape, not cut, so  you end up with greenish and whitish shavings. Use a sharp knife, scrape through the inner bark to the cambium, letting the fluffy pieces fall onto a cookie tray. Gather the scraped inner bark and cambium. Immerse it in room-temperature water. Refrigerate for 2-4 hours. The brew should range from amber to dark brown. Add more inner bark, if necessary. Strain solids. I use a coffee filter, but a strainer or cheese cloth will also work and add equal amounts of maple syrup. For carbonation, add seltzer water.                                                                                                                                 

Timeline
Note: You need to scrape the cambium as soon after you harvest the branches as possible. Do not let the branches dry out. Once you immerse the cambium in liquid and then strain it, birch beer can be stored in the refrigerator for up to one week.
4-6 Hours Before:
Harvest two small, fresh birch branches up to 1" diameter, 8"-10" long
Collect 1-2 handfuls of small, fresh twigs
Fill container with room temperature drinking water
Scrape cambium on to cookie sheet
Add cambium to water
Refrigerate
1-2 Hours Before:
Remove from refrigerator and strain liquid
Add 1 cup grade B or 2 cups Grade A syrup and 1/2 tsp cinnamon
5-10 Minutes Before:
Add carbonation if desired
Serve

Shopping List
Foraged items:
2- small, fresh birch branches, up to 1" diameter, 8-10" long
1-2 handfuls of small, fresh match stick size twigs
Pantry Items:
Drinking water
Maple syrup
Cinnamon
Seltzer (optional)
Kitchen Items
Strainer or coffee filter or cheese cloth
2-3 quart water container
Cookie sheet

TJF Originals, Entrees

Acorn Sliders: A Delicious, Hearty Burger Alternative

              Hearty Acorn Sliders have a smoky, meaty flavor

              Hearty Acorn Sliders have a smoky, meaty flavor

Acorns are probably my favorite foraged food now that I know how to make them tasty. They are nutritious and filling. As an urban/suburban forager, I have a freezer instead of a wood stove, which works best for storing the white oak acorn species I typically gather. When I am ready for acorn burgers, I take out the amount of acorns I need for each recipe. Every once in a while, I have a few days to spend in the kitchen. I will prepare more acorns than I needs and put the prepared acorn in freezer bags to use as needed. Acorns stored in their shell in the freezer have lasted three years or more in my deep freeze. If I make a large amount of chopped acorns to freeze for later use, I try to use that within a year.

Acorns are the original slow food. Acorns in the white oak family will release their tannins more quickly than red oak acorns. In an ideal world, I'd live near a fast moving stream and let Nature do the work. But even in the 21st Century, acorn preparation can be timed to your daily schedule. Once you defrost and remove the shells from the acorns, chop them in your food processor, or if you're stubborn like me, chop them by hand. I fill a five gallon pot with water and bring it to a boil. Remove the pot from the heat and add acorns that have been shelled and chopped. This is the slow food part. Let the acorns soak for six or more hours. Go to work or whatever you have to do. When you come home, drain the water. I save a bit of the water to use on my skin to soothe insect bites or sunburn. Discard the rest. Fill the five gallon pot with fresh water, bring it to a boil. Remove from the heat. This part is critical. If you boil the acorns in the water, they will be mushy. Let the acorns soak. Do this again before your go to bed. In the morning, taste one or two acorn pieces. If your mouth goes dry, start with a clean pot of water and repeat the process. The acorns will taste mild, maybe even sweet when the tannins are completely removed. Once the acorns are ready, you can put them back in the food processor for a finer texture.

Timeline
2-3 Days Before:
Prepare acorns, remove shells, chop acorn nut meats, soak rinse 3-4 times
Prepare wild garlic, clean, separate bulbs from greens
1 Hour Before:
Chop onion and garlic
Mix ingredients and form acorn slider patties
30 Minutes Before:
Preheat oven - line a cookie sheet with foil
Heat oil - crisp acorn sliders on both sides, remove from oil, drain
Place sliders on cookie sheet
10 Minutes Before:
Place cookie sheet in oven for 10 minutes
Serve


Shopping List
Foraged Items:
5 cups prepared Acorns
1-2 bunches Wild garlic
Produce:
1 onion medium size
1-2 cloves cultivated garlic
Pantry Items:
2 tsp dried oregano
1 tsp dried basil
1/2 tsp ground black pepper
2 tsp sea salt
1 cup quick oats or old fashioned oats
1/2 cup cooking oil

Recipe Revamps, Soups

Wild Japanese Knotweed and Berry Soup: A Colorful Bowl of Flavor

Japanese Knotweed (fallopia japonica) is an invasive plant that looks like asparagus, tastes like rhubarb, and will march across your property like an army. The most effective way to keep this plant from taking over is to eat it as fast as it grows.

When the tiny spears emerge in late March, the stalks are tender and delicious for about three weeks. After that they are woody and unpalatable. Like rhubarb, uncooked knotweed freezes beautifully, so harvest in abundance while you can and enjoy it all year round.

Recipes involving Japanese knotweed and rhubarb often call for sugar. Not this recipe. In fact, sugar would ruin it. The berries give this soup a beautiful color.

Serves 10-12 people

Foraged Ingredient:
4 cups Japanse knotweed, peeled  
Produce:
1 cups apples, peeled and cored
1 cup pears, peeled and cored
4 cups berries, mixed or choose one kind of berry
1.5 cups raisins

Timeline:
1-2 Days Before:
Harvest flexible stalks that are about the size of asparagus                                                      
Peel the thin outer skin from each stalk and discard
Chop the stalks into half inch pieces, refrigerate until ready to use                                                             
1-2 Hours Before:
Peel and core apples and pears, cut into quarters
Put apples and pears into large soup pot                 
Add berries and knotweed pieces to soup pot
Cover ingredients with water                                                                                        
Bring water to a boil 
Reduce heat and simmer 
Serve hot immediately or chill and serve cold    

Shopping List:
*Note: it's fun to forage for wild fruit, but the soup is just as tasty when prepared with items sold in the market
Foraged Items:
Japanese knotweed
*Wild berries, like blueberries, mulberries, if you find them
*Wild apples/pears if you find them
Market Items:                                                                                                                                
Apples
Pears
Berries of your choice, blueberries, strawberries, raspberries
Raisins – golden or dark
Pantry:
Knife for peeling and cutting knotweed and fruit
Soup pot                                                                                                                                  

Beverages, Recipe Revamps

Pine Needle Tea: A Fragrant Winter Warm Up

Pine trees are truly magical. You find them growing in urban, suburban and rural environments, yet their familiar presence is quite often overlooked.

                                         &nb…

                                           Pine Needle Tea is the perfect winter treat

I grew up playing outdoors in all seasons. Building snow shelters, finding foraged foods, following animal tracks, and sledding all kept me busy and engaged.

Winters with light fluffy snow are magical. Winters with wet dense snow or sleet that encases every surface in ice are the ones where I really feel the cold. As I got older and more focused on honing my skills, I began to appreciate just how many foraged foods are there to take the chill out of winter.

The mature leaves of the pine tree are called needles. They are easy to harvest. You only need a few. Pluck a handful of pine needles nearest the trunk, where they are highest in Vitamin C. You'll need about 10 pine needles per cup.

Once you get home and you drop the fragrant needles in water that has come to a boil, it's a full sensory experience. The warmth and the aroma feel like a hug. The light, sweet flavor feels comforting on the tongue and all the way to the tummy.

Timeline:
1-2 Hours Before
Gather 10 pine needles per cup of tea, put in a container to carry home
10 Minutes Before
Bring a pot or kettle of water to a boil.
5 Minutes Before
Chop pine needles.
Use a strainer and large pot or tea ball/tea bags for individual cups
Put pine needles in the large pot or tea balls, tea bags, cheesecloth
When water is boiling, turn off heat and remove from stove top.
Pour the water over the pine needles.
2 Minutes Before
Taste the mixture. Let it steep longer for a stronger taste.
Strain or remove the pine needles from the water.
Drink as is or add sweetener of your choice.

Shopping List
Foraged Items:
Pine needles growing nearest the trunk

Pantry
Tea bags, tea balls, cheesecloth, gauze
Strainer
Tea kettle or large saucepan
Tea pot, mugs or cups
Honey, sugar or any sweetener

Yes, You Can Pickle That...But Should You?

Freshly harvested plants typically have a window of time when they taste best. For a few days or a few weeks we have more than anyone could possibly eat and then nothing for the rest of the year. The only way to get that fresh picked flavor is to preserve the excess.

    Carrie Brownstein and Fred Armisen of IFC Channel's Portlandia

    Carrie Brownstein and Fred Armisen of IFC Channel's Portlandia

For centuries canning, including making pickles and making jams, was an essential food preservation technique. In the 21st Century, canning, has become an artisan craft. I do not happen to like the flavor or texture of pickles. I also do not like the mushy texture and dull color of canned vegetables.

Portlandia notwithstanding, most people are not aware that canned foods lose their nutritional value, texture and flavor after two years in storage

Dehydrating is another time honored option, with the added benefit that dehydrated foods can be kept for years if stored property.

Dehydrating is my favorite way to preserve food for many reasons, including:

  • It's easy to do.
  • Dehydrated food takes up less room on the shelf.
  • Dehydrated food can last much longer than two years, unlike canned food.
  • Dehydrated food can be made into snack chips or dried for future soups or stews.
                                         &nb…

                                           Dehydrated fruits

Foraging is ultimately an individual experience. My small apartment forces me to maximize space. Based on my non-scientific observation, I can fit at least five times more dehydrated food than non-dried food in the same size container.

Winter is the perfect time to enjoy the flavor of rehydrated fungi fruits and vegetables. Rehydrated morel mushrooms with baked pasta is a true comfort food for mushroom lovers. For years, I never understood all the fuss about morels, which are tasty when eaten fresh. When dried and rehydrated, morels are a feast for all the senses, which may be why some
mushroom lovers consider morels rehydrated (especially in cream) even more satisfying than sex.

Dehydrators range from the simple to the complex. The simple, bare bones model fits in my tiny apartment. The high-tech model  is convenient because you can dehydrate more food at one time, but it generates a lot of heat. When I tested a high tech dehydrator, I had to set it up on my deck to use it at all.

My second favorite preservation technique is deep freezing. When given the choice to purchase a 5-cubic-foot freezer or a flatscreen tv, I chose the freezer. The freezer cost only $200 and I don't have a monthly cable bill. When my hunter friends come through with deer, I have some place to put the meat so I can enjoy it in a number of ways, including dehydrating it for jerky. As soon as the deer becomes venison, even the jerky meat is frozen; it's much easier to slice through frozen meat for even, thin slices.

I'm one of those stubborn people who insist on eating food that tastes really delicious. In the dead of winter, vegetables picked ripe in season and immediately frozen or and dehydrated have a stronger flavor than the same vegetables sold in the store.


Treats

Maple Syrup Snow Cones: A Sweet Winter Treat

I grew up eating snow.

Fresh, new fallen snow can easily be collected in a plastic cup. Simply put an ice cube in the bottom of the cup, so the cup stays upright. Place the cup where snow will fall, but where the cup will not be kicked or blown down. At 1" to 2" per hour, you should be able to eat as many snow cones as you want!

My favorite topping is maple syrup, because I get it fresh from a local source. But it's winter and the weather can be daunting and it's a great time to enjoy any flavor you like. I might try this with mushroom-infused vodka.

This year, I'm going to make snowballs and freeze them until July.

Timeline
During the Storm, 20 Minutes Before:
Put one ice cube into each plastic 8 oz cup and set out while snow is falling
When cups are full, bring indoors
After the Storm  1-2 Minutes Before:
Scoop fresh snow into cups
Bring indoors 

Indoors:
Pour 1-2 Tablespoons maple syrup on snow
Add syrup as needed                                      

Shopping List:
Maple syrup or any syrup flavor, such as blueberry or strawberry
Plastic cold cups
Pantry:
Ice cube tray
Plastic cups
Teaspoons make eating snow cones less messy

Entrees, Recipe Revamps

Baked Pasta with Morels: A Great Variation On Mac + Cheese

                                         &nb…

                                                 Morels and angel hair pasta make a great variation on the mac and cheese theme

Winter 2011 was the  last time winter had such a fierce grip. That following spring I found more wild morel mushrooms than I ever have before or since. I never understood why people get so passionate about morels. When harvested and eaten fresh, morels are pleasant enough. But morels that have been dehydrated and then rehydrated have a rich, intense flavor that awakens every sensory experience. Now I understand why some mushroom lovers find eating morels more satisfying than sex.

Dried  morels can be stored for years in air tight containers out of direct light.

Dried  morels can be stored for years in air tight containers out of direct light.

Dried morels can be stored for years if you keep them in an air tight container and  in a dark place, like the back of your pantry shelf.

This recipe has few ingredients because I like to let the morel be the star of the dish. You can certainly add any vegetables, spices or other ingredients that you want.    

Ingredients:
1 cup dehydrated morel mushrooms
liquid to cover morels, cream, broth, or water
1 medium onion, chopped
1/4 cup chopped garlic
2 eggs, beaten
1 cup hard cheese, like cheddar, shredded
8 oz angel hair pasta
Cooking oil, butter, or a combination 
Timeline:
2 Hours Before:
Soak morels in the liquid of your choice
30 Minutes Before:
Chop onions and garlic
Shred cheese 
20 Minutes Before
Sauté onions, then sauté garlic
Remove morels from liquid, drain, but save liquid 
Put pasta water on to boil
10 Minutes Before
Chop morels
Beat eggs with saved liquid 
Add morels, eggs and liquid to onions and garlic, stir thoroughly over low heat
5 Minutes Before
Drain pasta and add to the other ingredients, stir thoroughly over low heat
Sprinkle shredded cheese over the top, cover, turn off heat, let cheese melt

Shopping List
Dried morels if you do not have them
Angel hair pasta 
Hard cheese, like cheddar 
Cream or broth  
Eggs  
Onions 
Garlic 

Pantry
Cooling oil and/or butter 
Skillet, preferably cast iron 
Large pot for boiling pasta 
Strainer  
Cheese grater 

Interview: Found + Foraged, A Television Show About Urban Foraging

It is my pleasure to introduce Lisa Marie Bhattacharya, host and co-producer, along with Deborah Burns, of Found + Foraged. This online television series is dedicated to urban foraging of wild edibles available where they live in Vancouver, British Columbia.

Many wild edibles found in urban areas grow abundantly all over the world. Plants like chickweed, garlic mustard and field garlic, thrive where the soil has been disturbed.

When I saw the trailer for this series, I knew that Lisa Marie and Deborah were joyful forager soul mates. I can easily imagine myself out in the field with them. Their insightful comments as foragers and media producers in the following interview are the next best thing.

The Joyful Forager: What was your first foraging experience? Where were you and were you mentored or self taught? 

Deborah Burns: Lisa Marie and I are stepsisters and we grew up in a small town on the West Coast of Canada, where foraging was pretty natural. From very little I was picking blackberries, raspberries, and strawberries. As I got a bit older I went out for oysters and clams with my best friend and her mom who are Native Indian. 

Lisa Marie Bhattacharya: I, too, remember picking berries for as long as I can remember. In more recent years I had a physician friend/mentor take me foraging on Bowen Island, BC. He learned a lot from his First Nations friends and colleagues. I learned mostly about medicinal mushrooms that are prolific here in BC and throughout the Pacific Northwest and apparently also the east coast and everywhere in between, too.

                   Lisa Marie Bhattacharya holding clover leaves and flowers. Photograph by Found + Foraged.

                   Lisa Marie Bhattacharya holding clover leaves and flowers. Photograph by Found + Foraged.

TJF: Deborah, I share your definition of foraging for useful materials as well as healthy food. One issue we have here on the east coast is that invasive plants, some from the west coast, become easily established, preventing local native species from growing. Do you think that encouraging beginning foragers to harvest invasive species in abundance would be a way to help native species survive?     

DB: I think that is an amazing solution for beginners or seasoned foragers. Once people know what is edible, especially weeds in their yard, I think they could be more inclined to harvest for to eating or making an extra few dollars at the farmers market. It might also stop the use of Roundup.  

LMB: Great idea. Another great way to keep invasives at bay, certainly smarter than just applying weed killers. I like the idea of encouraging children going door to door in their neighbourhood to help forage invasives in people's yards and collecting an income and then having another opportunity to sell them at a farmer's market. We may be onto something! Inspiring children is a great place to start if you want to inspire change. They have a natural sense of wonder, curiosity and drive to do what interests them. So I’m putting more and more my focus on educating young people so they can inherit a better planet.

TJF: Lisa Marie, the idea of having children weed the neighbors' yards and then sell the wild edibles at farmers' markets is brilliant. I hope that idea catches on across North America. What would you say to someone who recognizes a dandelion, but has never thought about it as food?                                          

DB: I would probably first tell them you can make it into wine. 

LMB: Ha! Yes, there's one place to start. I find that telling people of the inherent medicinal properties, or at least the nutritional ones, usually inspires people to see it through a different lens and peak their interest toward considering consuming them.

DB: Anything with a wild mushroom in it.

LMB: Chickweed pesto and oyster mushrooms risotto with some kind of wild green, i.e.: mustard greens, sea asparagus, are two favourites.

TJF: Will people outside your area be able to see the Found + Foraged pilot? 

DB: Yes, it will be aired on Telus Optik TV On Demand, and on our YouTube channel.

TJF: How have producers, networks and viewers reacted to the idea of a foraging program?

DB: We have had really amazing support from the community, friends and have had a few messages about how do we take Found + Foraged to the next level. It’s really exciting and we are looking forward to when the pilot episode airs. We are part of a competition on Telus, called Storyhive. In the first round we produced a two minute pitch where we competed against 120 local filmmakers. We and 14 other teams won funding to make our pilot episode. When the pilot airs, we will compete with the remaining 14 teams for a chance to have a full five episode season produced.                                                                                                     

LMB: I've been really touched by the breadth of support from all kinds of people. I think it really resonates with a broad demographic.

TJF: What would you say to aspiring TV and film producers who share your passion for foraging?

DB: There's lots to forage out there, and I think the more well researched information out there for the general public the better. Its our community and world; we should be more connected.

LMB: This is a story that needs to be told. The global community is starving for a return to a natural way of being, a sense of re-connection. This kind of show has the potential to be a wonderful conduit?

TJF: Is there anything else you would like to share about foraging or media?   

DB: Found + Foraged will be competing for the top spot on Storyhive in March 2015. Please come check out our pilot episode and vote for us at www.storyhive.com.       

LMB: Pick up a book from your local library, research local wild food resources online too and find out what you can forage in your area. You won't believe the nutritive potential (as well as medicinal) of so many plants and fungi that grow wild, that we haven't got a clue about and that we take for granted. And of course tune in and watch our show! Many things we'll be harvesting will be available in many parts of the world, not just coastal BC.    

TJF: Lisa Marie and Deborah, thank you very much for your time and your insights. The Joyful Forager will make it a point to watch your show and keep my followers informed of your progress. Wishing you abundant wild harvests and happy, healthy, budget-friendly eating.  

My thanks to Lisa Marie Bhattacharya, RHN, Found + Foraged Host, Writer, Nutritionist and Medicinal Mushroom Harvester and Deborah Burns, Found + Foraged Producer, Writer and Director for this interview.